🤖 Journey Through Building a Microservices System with NestJS
Hello fellow developers and tech enthusiasts! 👋 I’m thrilled to introduce “Tasker” — my latest project built with NestJS, now live on…
🤖 Journey Through Building a Microservices System with NestJS
Hello fellow developers and tech enthusiasts! 👋 I’m thrilled to introduce “Tasker” — my latest project built with NestJS, now live on GitHub 🌐. Tasker is a testament to the power 💪 and elegance 🍽 of microservices architecture in a real-world application 🗺. It’s not just a project; it’s an encapsulation of my journey with NestJS and microservices.
GitHub Repository 🗄
Tasker on GitHub 🕸: Tasker GitHub Repository.
Discover the repository here, each microservice, the HTTP client, and the Docker configurations are available for you to explore, fork, and adapt.
Why NestJS for Microservices? 🤔
NestJS was the framework of choice for several key reasons:
Embracing TypeScript’s Power 🚀: NestJS’s integration with TypeScript ensures robust and maintainable code.
Angular-Inspired Architecture 🌟: For those familiar with Angular, NestJS offers a similar modular and structured approach.
Built for Microservices 🌐: NestJS’s native support for microservices architectures ensuring seamless communication between services.
Learn More About NestJS
- Beginner’s Guide: NestJS Roadmap for Beginners.
- Core Concepts: Understanding NestJS Core Concepts.
- Official Documentation: NestJS Documentation.
Diving Into Microservices World 🌐
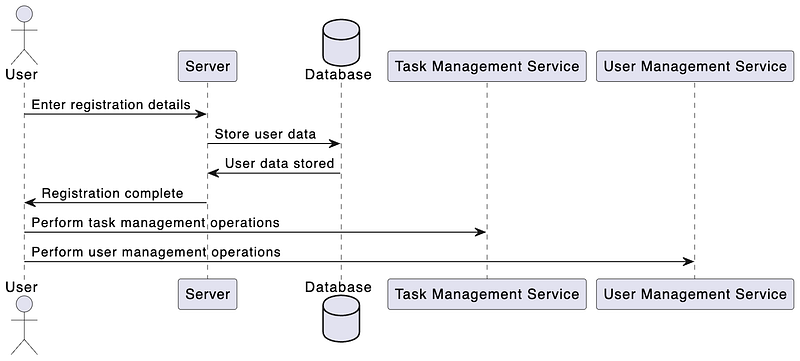
Tasker is structured into two main microservices and one http client, each serving distinct functionalities within our task management ecosystem:
- HTTP Server 🕸: It is the main gateway which responsible for request validation authentication 🔐 and routing ➡️ communicate with these two 👇.
- User Management Microservice 👲: This service is all about managing user data. From user creation to authentication, it’s the backbone of user-related operations.
- Task Management Microservice 🗒 : As the name suggests, this service handles everything related to tasks — creating, updating, and managing the life cycle of each task.
Now let’s Jump into see all three working together.
Tasker HTTP Application: The Central Gateway 🌐
Tasker’s HTTP application plays a pivotal role as the heart of the system, seamlessly orchestrating interactions between the user interface and the microservices. Here’s an insight into its key functionalities:
Core Functionalities of the HTTP Server
- Authentication 🔐: It uses JWT (JSON Web Tokens) along with NestJS’s JWT library for authenticating requests and verifying necessary roles.
- Request Validation 🥅: Employs class-validator for validating request parameters and class-transformer for necessary parameter transformations.
- Routing 🚗: Efficiently routes requests to the appropriate microservice and handles the processed response.
Establishing Connections with Microservices
The HTTP application leverages NestJS’s ClientsModule for creating robust TCP connections with both User and Task Management microservices:
import { Transport, ClientsModule } from '@nestjs/microservices';

@Global()
@Module({
    imports: [
        ClientsModule.registerAsync([
            {
                name: 'USER_MICROSERVICE',
                // Configuration for User Microservice
            },
        ]),
        ClientsModule.registerAsync([
            {
                name: 'TASK_MICROSERVICE',
                // Configuration for Task Microservice
            },
        ]),
    ],
    providers: [MicroserviceClientService],
    exports: [MicroserviceClientService],
})
export class SharedModule {}
This configuration ensures smooth communication over TCP transport.
MicroserviceClientService: Streamlining Communication 📞
The MicroserviceClientService simplifies the complexity of inter-service communication:
import { Injectable, Inject, InternalServerErrorException } from '@nestjs/common';
import { ClientProxy } from '@nestjs/microservices';
import { firstValueFrom } from 'rxjs';

@Injectable()
export class MicroserviceClientService {
    constructor(
        @Inject('USER_MICROSERVICE') private userClient: ClientProxy,
        @Inject('TASK_MICROSERVICE') private taskClient: ClientProxy,
    ) {}
    private async exec(client: ClientProxy, cmd: string, data: any): Promise {
        const msRes = await firstValueFrom(client.send({ cmd }, data));
        if (msRes && msRes['status'] === 'error') {
            throw new InternalServerErrorException(msRes['message']);
        }
        return msRes["data"];
    }
    execTask(cmd: string, data: any): Promise {
        return this.exec(this.taskClient, cmd, data);
    }
    execUser(cmd: string, data: any): Promise {
        return this.exec(this.userClient, cmd, data);
    }
}
This service’s exec method sends a command to the designated microservice and handles the response, encapsulating the logic for inter-service requests.
Interfacing with the Task Microservice 📋
Each microservice file, like the TaskService in the HTTP application, is tailored to handle specific operations. It interacts with the Task Management Microservice using the MicroserviceClientService:
@Injectable()
export class TaskService {
    constructor(private microserviceClientService: MicroserviceClientService) {}

    createTask(data: CreateTaskDto): Promise {
        return this.microserviceClientService.execTask(TASK_COMMAND.CREATE_TASK, data);
    }
    // Additional task-related methods...
}
Each method in TaskService aligns with a specific operation in the Task Management Microservice, ensuring efficient and targeted task management.
Dynamic Secret Management
For dynamic secret management, the HTTP application uses the @nestjs/config module's ConfigService, offering a flexible and secure approach to handle configuration and secrets.
Having explored the HTTP application’s pivotal role in Tasker, let’s now dive deeper into the microservice implementation. Since the Task and User microservices share similar structures and functionalities, examining one will provide a clear understanding of both. Let’s delve into one of these services to unravel their inner workings.
User Management Microservice: A Deep Dive 🚀
The User Management Microservice in “Tasker” is a standalone application responsible for handling all aspects of user data. Unlike traditional HTTP controllers, it uses message patterns to respond to requests, showcasing NestJS’s microservices capabilities.
Setting up the Microservice 🛠️
The microservice is bootstrapped in main.ts, where we set up the NestJS microservice options and listen for incoming TCP connections:
// main.ts
(async function() {
  const appContext = await NestFactory.createApplicationContext(AppModule);
  const configService = appContext.get(ConfigService);
const host = configService.get('HOST', 'localhost');
  const port = configService.get('PORT', 3001);
  const app = await NestFactory.createMicroservice(AppModule, {
    transport: Transport.TCP,
    options: { host, port },
  });
  await app.listen();
  console.log(`User Microservice is listening on ${host}:${port}`);
})();
This setup allows the microservice to communicate over TCP with the HTTP server or other microservices.
Controller: Handling User Operations 🎮
Unlike a standard HTTP controller, the UserController in this microservice uses MessagePattern decorators to handle requests. This approach is specific to NestJS microservices:
// UserController
@Controller('user')
export class UserController {
    constructor(private userService: UserService, private responseService: ResponseService) {};
@MessagePattern({ cmd: USER_COMMAND.CREATE_USER })
    async createUser(data: CreateUserDto) {
        // Logic to handle user creation
    }
    // ... Other message patterns and methods ...
}
Each method corresponds to a command, allowing for targeted and efficient handling of user-related operations.
Service: Core Business Logic 💼
The UserService deals with the core business logic for user operations. It interacts with MongoDB using Mongoose for data persistence:
// UserService
@Injectable()
export class UserService {
  constructor(@InjectModel('User') private userModel: Model) {}async createUser(data: CreateUserDto): Promise {
    // Logic to create a user
  } // ... Other user management methods ...
}
The service checks for existing users, handles user creation, updates, and more, ensuring a robust and efficient user management system.
How It Differs from HTTP Controllers 🌐
The key difference between this microservice and a traditional HTTP server lies in the communication pattern:
- In the HTTP server, controllers handle HTTP requests (GET, POST, etc.) directly from the client.
@MessagePattern({ cmd: USER_COMMAND.CREATE_USER })- In the User Management Microservice, controllers respond to internal commands sent through TCP communication, typically from the HTTP server.
This design ensures a clear separation of concerns, with the microservice solely focused on user management operations, abstracting away the complexities of direct client communication.
The same implementation is followed by task service.
With a comprehensive understanding of Tasker’s HTTP and microservice architecture, we now venture into the realm of containerization. This step ensures seamless operation and alleviates the complexities of local setup. Welcome to Docker — where the intricacies of environment setup are a thing of the past!
Docker the world of reduced blames 😆
For each component of Tasker
- HTTP Client
- User Microservice
- Task Microservice
I have meticulously set up individual Dockerfiles. These Dockerfiles are tailored to construct container images, perfectly suited for each service’s unique requirements.
Dockerfile: Building the Application Images 🐳
Your Dockerfile is set up to create container images for your services and HTTP application:
FROM node:18
WORKDIR /usr/src/app
COPY package*.json ./
RUN npm install
COPY . .
ARG PORT=4001
ENV PORT=${PORT}
EXPOSE ${PORT}
CMD ["npm", "run", "start"]
docker-compose.yml: Orchestrating Containers 🌐
The orchestration of these diverse components is managed through a master docker-compose.yml file. This file not only coordinates the interactions between the microservices and the HTTP application but also integrates a MongoDB database within the setup:
# docker-compose.yml
version: '3.8'
services:
  # User Microservice
  user-microservice:
    # Configuration for building the image and setting up the service
    # ...
# Task Microservice
  task-microservice:
    # Similar setup as the user-microservice
    # ...
  # Tasker HTTP Application
  tasker-app:
    # Builds the HTTP application
    # Includes volume mappings for hot reloading and debugging
    # ...
  # MongoDB Database
  mongo:
    image: mongo
    ports:
      - "27017:27017"
    volumes:
      - mongo-data:/data/db
volumes:
  mongo-data:
Each service is configured with the necessary environment variables, ports, and dependencies. The tasker-app . This comprehensive setup means that there’s no need for a separate database setup.
Hot Reloading and Debugging 🔄🔍
The inclusion of volume mappings in the tasker-app service:
volumes:
  - ./tasker:/usr/src/app
  - /usr/src/app/node_modules
allows for real-time code changes to be reflected in the container without rebuilding it. This setup is ideal for development as it significantly speeds up the feedback loop and makes debugging more straightforward.
Join the Conversation! 💬
We hope you found our journey to a more efficient deployment process inspiring and informative. But the conversation doesn’t end here! We’d love to hear from you and learn about your experiences with deployment, troubleshooting, and collaboration.
Share Your Story 📢
Have you encountered deployment challenges similar to ours, or do you have your own unique experiences to share? Whether it’s a deployment triumph or a troubleshooting tale, your story can provide valuable insights to the community.
Ask Questions ❓
If you have questions about the Cloud Run setup, Docker deployment, or any other topic covered in this blog, don’t hesitate to ask. I and fellow readers are here to help you find solutions.
Connect with Us 🌐
Join us on social media, where we regularly share tips, updates, and insights about web development and deployment. Follow us on Twitter, LinkedIn, or Facebook to stay connected with our growing community of developers.
Feedback and Suggestions 📝
We value your feedback! Is there a specific topic you’d like us to explore in future blogs? Do you have suggestions on how we can improve our deployment process even further? Let us know; your input shapes the content we create.
Stay Tuned for More 📅
Don’t miss out on our future blog posts! Subscribe to our newsletter or follow our blog for the latest updates, tutorials, and stories from the world of web development and deployment.
Thank you for joining us on this deployment journey, and we look forward to engaging with you in the comments, on social media, and in future blog posts. Together, we can make deployment easier and more efficient for everyone! 🚀🌐