🚀 Optimizing Docker for Node.js: From 1.34 GB to 267 MB! 🐳✨
In this blog, we’ll walk you through our before and after Dockerfiles, highlight the optimizations, and share tips for creating…
🚀 Optimizing Docker for Node.js: From 1.34 GB to 267 MB! 🐳✨
In this blog, we’ll walk you through our before and after Dockerfiles, highlight the optimizations, and share tips for creating production-ready Docker images.
Introduction
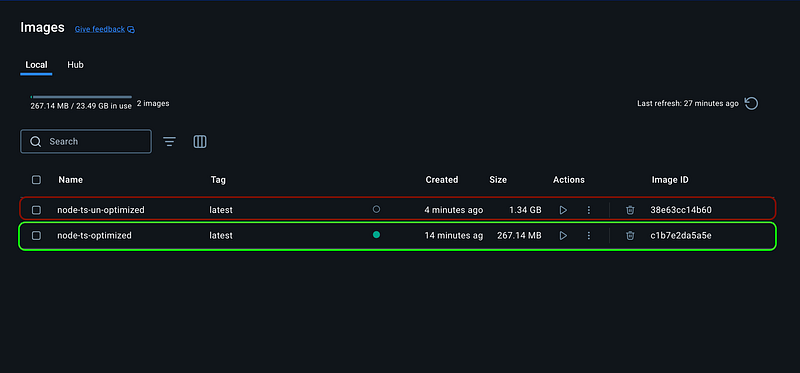
Building Docker images for production is a balancing act between functionality and efficiency. A bloated image not only wastes storage but also slows down deployments, builds, and scaling. Recently, we embarked on a journey to optimize our Node.js application’s Docker image and managed to shrink it from 1.34 GB to just 267 MB — a whopping 80% reduction!
The Problem: A 1.34 GB Monster 🐘
Here’s where we started — a typical Dockerfile for a Node.js application:
**Dockerfile.un-optimized**
# Use the Node.js image
FROM node:lts

# Set the working directory in the container
WORKDIR /usr/src/app

# Copy package.json and package-lock.json
COPY package*.json ./

# Install dependencies
RUN npm install

# Copy the rest of the application code
COPY . .

# Build the application
RUN npm run build

# Expose the application port
EXPOSE 3000

# Define the command to run the application
CMD ["node", "dist/main"]
This Dockerfile does its job — builds and runs the application — but it’s far from efficient. Why?
- Large Base Image:
node:ltsis versatile but includes many unnecessary components. - All Dependencies: Both development and production dependencies are installed in the same stage, bloating the image.
- No Multi-Stage Build: This means the final image includes unnecessary files like source code, test artifacts, and build tools.
The result? A 1.34 GB image that’s slow to build and deploy.
The Solution: A 267 MB Work of Art 🖌️
To address these inefficiencies, we reimagined the Dockerfile using multi-stage builds and the lightweight **node:lts-alpine** base image.
**Dockerfile.optimized**
# Stage 1: Build Stage
FROM node:lts-alpine AS build

# Set the working directory
WORKDIR /usr/src/app

# Copy package.json and package-lock.json
COPY package*.json ./

# Install all dependencies on given versions
RUN npm ci

# Copy the application code
COPY . .

# Build the application
RUN npm run build

# Stage 2: Runtime Stage
FROM node:lts-alpine

# Set the working directory
WORKDIR /usr/src/app

# Copy only the built files and production dependencies
COPY --from=build /usr/src/app/dist ./dist
COPY --from=build /usr/src/app/package*.json ./

# Expose the application port
EXPOSE 3000

# Start the application
CMD ["node", "dist/main"]
Key Optimizations
Let’s break down the magic:
1. Multi-Stage Builds
- The build stage compiles the application, including all dependencies and build tools.
- The runtime stage copies only what’s needed: the built
distfolder and production dependencies. - Unnecessary files (e.g., source code, dev dependencies) are left behind in the build stage.
2. Lightweight Base Image
- Switched to
**node:lts-alpine**, which is optimized for size (~35 MB) while retaining the essentials. - Result: Smaller image size and faster builds.
3. Production Dependencies Only
- Used
npm ci --omit=devto install only production dependencies in the runtime stage. - Excluded development tools like Husky by dynamically removing the
preparescript (npm pkg delete scripts.prepare).
The Results

Benefits Beyond Size
- Faster CI/CD Pipelines:
- Smaller images mean quicker pulls, pushes, and deployments.
- Multi-stage builds ensure a clean and reproducible environment.
2. Improved Security:
- By excluding unnecessary tools and files, we reduced the attack surface of the container.
3. Cost Savings:
- Smaller images save storage space in container registries and reduce bandwidth costs for deployments.
4. Ease of Debugging:
- The separation of build and runtime stages makes it easier to isolate issues.
Final Thoughts
Optimizing your Docker images is an investment in performance, security, and maintainability. By adopting best practices like multi-stage builds and lightweight base images, we not only improved our workflows but also set the stage for smoother scaling and faster deployments.
Have you optimized a Docker image before? Share your tips and tricks in the comments! Let’s keep the conversation going. 🚀🐳
What do you think of this journey? Let me know if you’d like more examples or technical deep dives! 🚀